x-technology

How to develop, build, and deploy Node.js NestJS GRPC microservices with Pulumi and Google Cloud Platform
The workshop gives a practical perspective of key principles needed to develop, build, and maintain a set of microservices in the Node.js stack. It covers specifics of creating isolated TypeScript dockerized services using NestJS framework and a monorepo approach with turborepo. The workshop includes an overview and a live exercise to create cloud environment with Pulumi framework and Google Cloud Platform services. The sessions fits the best developers who want to learn and practice build and deploy techniques using Google Cloud Platform stack and Pulumi, Node.js, and NestJS.
General
- 2-3 hours
- Advanced level
- Technologies overview - Node.js, TypeScript, NestJS, GRPC, Pulumi, GCP, Docker, Kubernetes, turborepo
- Example structure - turborepo configuration, common utilities, demo services
- Practical exercise - create cloud environment and deploy microservices to a cluster
Prerequisites
- Good understanding of JavaScript or TypeScript
- Experience with Node.js and writing Backend applications
- Preinstall Node.js, npm
- Preinstall Docker, docker-compose
- Preinstall Protocol Buffer Compiler
- We prefer to use VSCode for a better experience with JavaScript and TypeScript (other IDEs are also ok)
- Install gcloud CLI tool to access Google Cloud Resources.
Instructors
Alex Korzhikov & Andrew Reddikh
Materials

Workshop Begins!
Agenda
- Introduction
- Crypto 🦄 Currency Converter - Node.js
- Infrastructure - Google Cloud
- Pulumi
- Practice
- Summary
Introduction
Who are we?
Alex Korzhikov

Software Engineer, Netherlands
My primary interest is self development and craftsmanship. I enjoy exploring technologies, coding open source and enterprise projects, teaching, speaking and writing about programming - JavaScript, Node.js, TypeScript, Go, Java, Docker, Kubernetes, JSON Schema, DevOps, Web Components, Algorithms 👋 ⚽️ 🧑💻 🎧
Andrew Reddikh

Software Engineer, United Kingdom
Passionate software engineer with expertise in software development, microservice architecture, and cloud infrastructure. On daily basis, I use Node.js, TypeScript, Golang, and DevOps best practices to build a better tech world by contributing to open source projects.
What are we going to do today?
Which technologies are we going to use?
Crypto 🦄 Currency Converter - Node.js
What we’re building
We’re building a currency converter, which can be used over gRPC calls.

Our intention is to send a request similar to convert 0.345 ETH to CAD and as a result we want to know the final amount in CAD and conversion rate.
We also assume that, it could be more than one currency provider, e.g.
- Europe Central Bank rates
- Bank of England rates
- Crypto Rates
Here is how it works:
- Currency Converter fetches each of the provider, accumulates, and uses for conversion rates received from providers.
- Currency Provider is a proxy to gain single source of rates, it also converts rates into the common format defined in proto’s.
Prerequisites
1. Checkout demo project
Let’s get started from cloning demo monorepo
git clone git@github.com:x-technology/micro-services-nestjs-infrastructure-pulumi-gcp.git
2. Install protoc
For efficient work with .proto format, and to be able to generate TypeScript-based representation of protocol buffers we need to install protoc library.
If you’re a MacOS user and have brew package manager, the following command is the easiest way for installation:
brew install protobuf
# Ensure it's installed and the compiler version at least 3+
protoc --version
For Linux users
Run the following commands:
PROTOC_ZIP=protoc-3.14.0-linux-x86_64.zip
curl -OL https://github.com/protocolbuffers/protobuf/releases/download/v3.14.0/$PROTOC_ZIP
sudo unzip -o $PROTOC_ZIP -d /usr/local bin/protoc
sudo unzip -o $PROTOC_ZIP -d /usr/local 'include/*'
rm -f $PROTOC_ZIP
Alternately, manually download and install protoc from here.
3. Prepare environment
Make sure we have Node.js v14+ installed. If not, nvm is a very good tool to install multiple node versions locally and easily switch between them.
Then we need to install dependencies within the monorepo.
npm install # turborepo and dependencies
Yay! 🎉 Now we’re ready to go with the project.
Monorepo structure
For better monorepo project management we used Turborepo
The project shapes into the following structure:
.
├── Dockerfile              # docker mono image
├── docker-compose.yaml     # docker-compose to start everything at once
├── docs                    # code examples
├── infrastructure          # pulumi and google cloud platform
├── node_modules            # common node modules
├── package.json            # project meta information & dependencies
├── packages                # microservices source code
└── turbo.json              # monorepo configuration
Let’s move on 🚚
Using Turborepo
Turborepo brings to the table generic configuration which can be easily applied across all/or filtered packages.
We use our common modules compiled to JavaScript, so before using it in services we need to build it first. The following commands executed build command against all common packages:
// ./package.json
"scripts": {
  "build": "turbo run build",
  "start": "turbo run start:prod"
},
// ./turbo.json
"pipeline": {
  "build": {
    "dependsOn": ["^build"],
    "outputs": ["dist/**"]
  },
  "start:prod": {
    "cache": false
  }
}
npm run build
npm run start
curl http://localhost:3001/currency-converter/convert
What is GRPC?
gRPC Remote Procedure Calls, of course!

gRPC is a modern, open source remote procedure call (RPC) framework that can run anywhere. It enables client and server applications to communicate transparently, and makes it easier to build connected systems

- March 2015 🗓
- Google ➡️ Open Source
- Standardize Microservices Architecture, Framework & Infrastructure

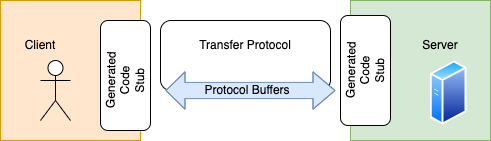
- Service Definitions (Protocol)
- Protocol Buffers ⏭
- Client & Server
- Generated Code (Stubs)
- 10+ Languages
- Platforms & Environments - Android, Web, Flutter
- Communication
- Authentication
// http://protobuf-compiler.herokuapp.com/
syntax = "proto3";

package hello;

service HelloService {
  rpc JustHello (HelloRequest) returns (HelloResponse);

  rpc ServerStream(HelloRequest) returns (stream HelloResponse);

  rpc ClientStream(stream HelloRequest) returns (HelloResponse);

  rpc BothStreams(stream HelloRequest) returns (stream HelloResponse);
}

message HelloRequest {
  string greeting = 1;
}

message HelloResponse {
  string reply = 1;
}
What are Protocol Buffers?
An efficient technology to serialize structured data
message Person {
  string name = 1;
  int32 id = 2;
  bool has_ponycopter = 3;
}
Does anyone know what numbers on the right side mean?
- Protocol Buffers - Google Developers
- July 2008 🗓
- Google ➡️ Open Source
- Typed
.protoformat - Code Generation
protoc- the protocol buffers compiler- 10+ Languages
- Third-Party Add-ons for Protocol Buffers
- Services Description
syntax = "proto3";

package hello;

service HelloService {
  rpc SayHello (HelloRequest) returns (HelloResponse);
}

message HelloRequest {
  string greeting = 1;
}

message HelloResponse {
  string reply = 1;
}
Demo - Hello Node.js GRPC
// package.json
"scripts": {
  "1. download prices": "node index.js",
  "2. generate protobuf runtime": "protoc --js_out=import_style=commonjs,binary:. prices.proto",
  "3. run protobuf transformation": "node index.js",
  "4. start grpc server": "node grpc-server.js",
  "5. start grpc client": "node grpc-client.js"
}
Demo - Run Microservices Locally
./packages/common- common libraries used in other project’s services./packages/services/grpc- gRPC services we build to share the product./proto- proto files, which describe protocol of input/output and communication between the services./node_modules- dependencies, shared between all microservices./lerna.json- lerna’s configuration file, defining how it should work with monorepo
"workspaces": [
  "packages/common/*",
  "packages/services/grpc/*"
]
const all = require('@common/go-grpc')
const client = new all.ecbProvider.EcbProviderClient('0.0.0.0:50051', all.createInsecure());
const response = await client.GetRates(new all.currencyProvider.GetRatesRequest())
response.toObject()
// inside converter container
const all = require('@common/go-grpc')
const client = new all.currencyConverter.CurrencyConverterClient('0.0.0.0:50052', all.createInsecure());
const response = await client.Convert(new all.currencyConverter.ConvertRequest({ sellAmount: 100, sellCurrency: 'USD', buyCurrency: 'GBP' }));
response.toObject()
npm start
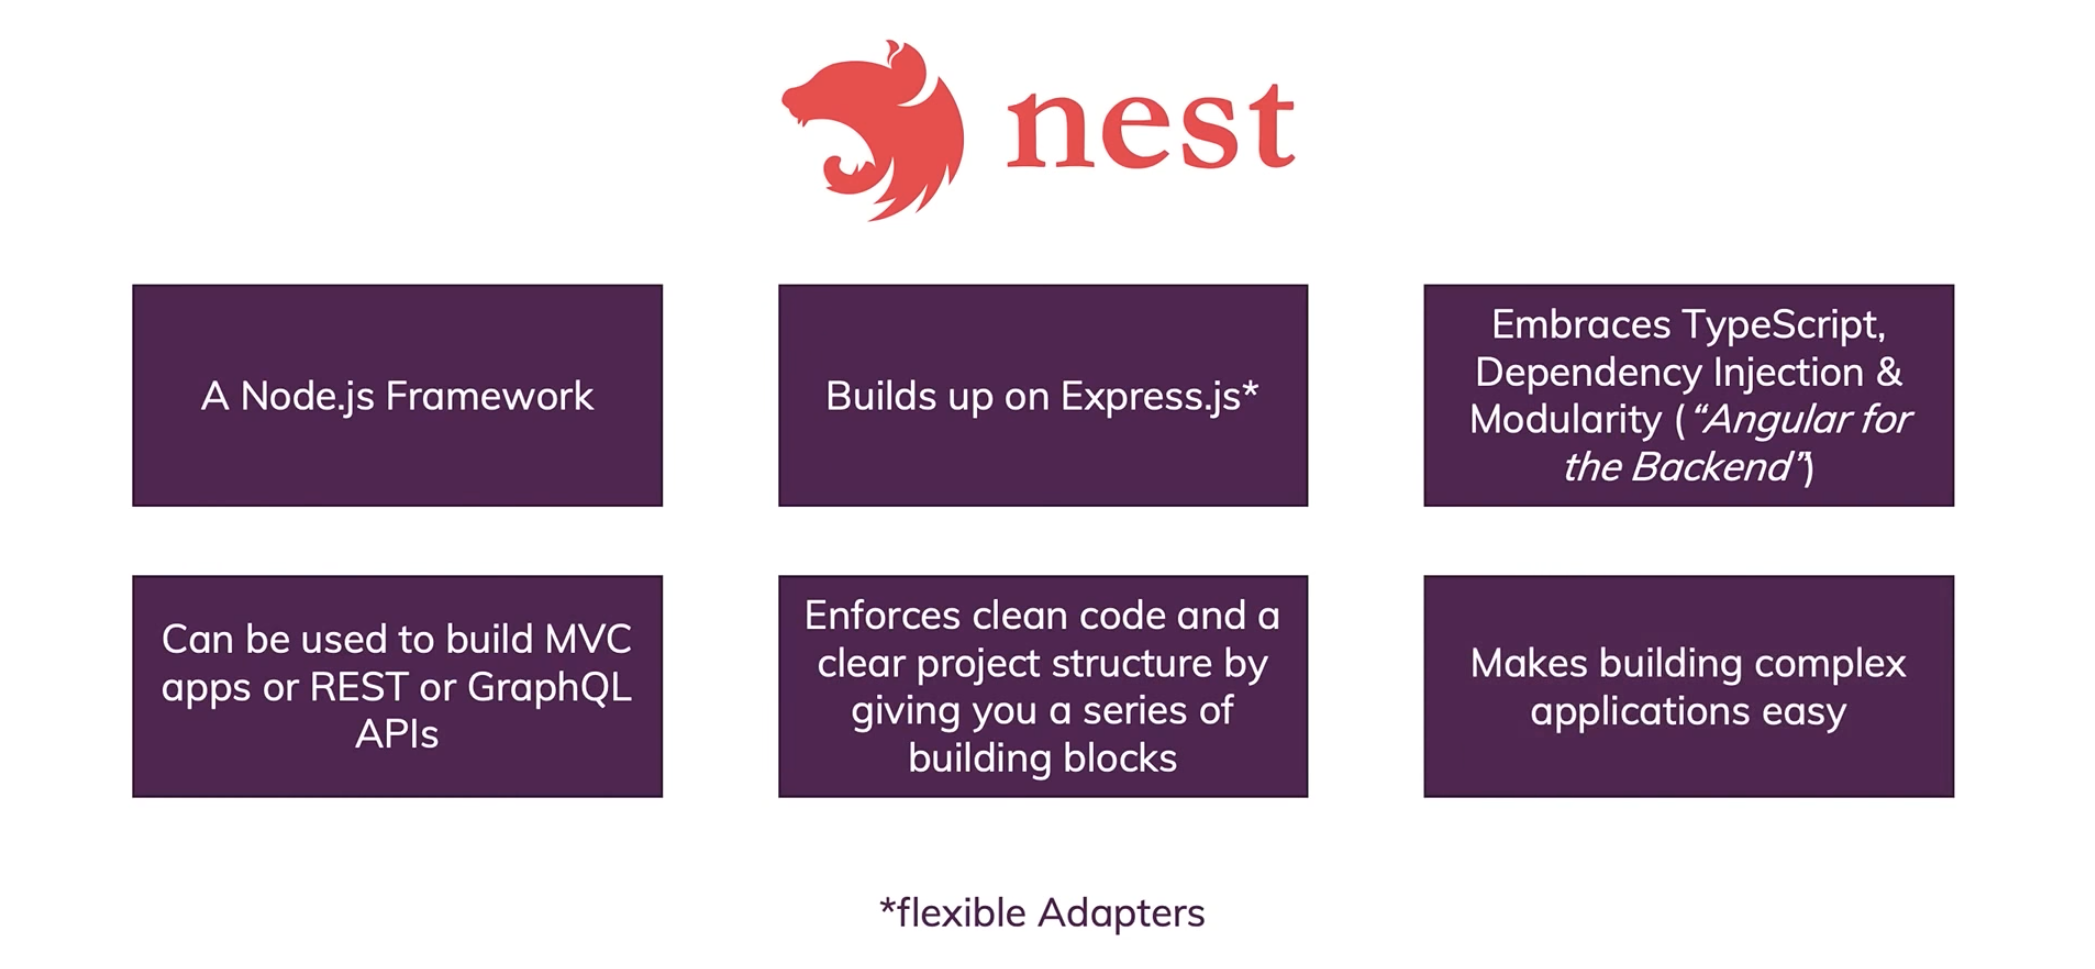
Nest Framework
A progressive Node.js framework for building efficient, reliable and scalable server-side applications
// modules
import { Module } from '@nestjs/common';
import { CatsModule } from './cats/cats.module';

@Module({
  imports: [CatsModule],
})
export class AppModule {}

// controllers
import { Controller, Get, Req } from '@nestjs/common';
import { Request } from 'express';

@Controller('cats')
export class CatsController {
  @Get()
  findAll(@Req() request: Request): string {
    return 'This action returns all cats';
  }
}
- Nest Documentation
TypeScriptwith Web ServersAngularfor Backend- Decorators, special types to control application flow
ExpressorFastify- Modular & Testable
- CLI
- REST APIs, GRPC, GraphQL
- Dependency Injection
- Observables / RxJS
- SOLID / DDD / AOP / CQRS
- Controllers
- Providers
- Modules
- Middleware
- Guards
- Pipes
- Interceptors
// @Body(), @Get(), @Post(), @Put(), @Delete(), @Patch(), @Options(), @Head(), @All()
@Get()
findAll(@Req() request: Request): string {
  return 'This action returns all cats';
}
Demo - All Together
# speed run
npx @nestjs/cli new movies            # create new nestjs microservice
cd movies
npm run start

# or full log
rm -rf packages
rm -rf tmp
mv packages tmp
mv tmp packages
cd packages
mv packages monolith
npx @nestjs/cli new movies
cd movies
npm start

# root
cd ../../
git checkout demo-new-nestjs-module   # monorepo full example
npm install                           # run turborepo tasks
npm run build
npm start

# test
curl http://localhost:3000/
curl http://localhost:3001/

# see currency converter monolith project
curl http://localhost:3001/currency-converter/convert
Issues - Practical Exercises
1. Attach Swagger Plugin for each package and check content, is GRPC auto documented?
npm install --save @nestjs/swagger swagger-ui-express
2. Split packages/monolith into separate microservices.
Make sure turborepo configuration is updated, build and start all services
3. Fix type definitions inside controllers, why observable types are generated instead of Promises?
// packages/monolith/src/currency-converter/currency-converter.controller.ts
@Get('convert')
  async convert(): Promise<ConvertResponse> {
    // TODO fix type definitions
    const $rates = this.currencyConvertClient.Convert(ConvertRequest.fromJSON({
      sellAmount: 100,
      sellCurrency: 'USD',
      buyCurrency: 'GBP',
    }));

    const firstNumber = await firstValueFrom($rates as unknown as Observable<ConvertResponse>);
    const rates = firstNumber as unknown as ConvertResponse

    return rates
  }
Infrastructure - Google Cloud Platform
Introduction to Google Cloud Platform
Google Cloud Platform is a enourmous cloud ecosystem that enables to organize, develop, publish applications worldwide
- Organization Resources - Users, Tasks
- CI/CD - Repositories, Pipelines, Artifacts
- Integrations
Docker - Build application as a docker image
Let’s have a quick look into Dockerfile and see how it works.
FROM node:16.18.0 as builder

RUN apt update && \
  apt install -y protobuf-compiler

# Create app directory
WORKDIR /usr/src/app

# A wildcard is used to ensure both package.json AND package-lock.json are copied
COPY package*.json turbo.json ./

COPY packages ./packages

# Install workspace dependencies
RUN npm install

# Creates a "dist" folder with the production build
RUN npm run build

# Start the server using the production build
CMD [ "node", "packages/dist/main.js" ]
GitHub Actions - Make builds automatically
Here is GitHub Actions file which defines building/publishing docker image on every push to repository in specific paths.
name: Docker Image Build

on:
  push:
    branches:
      - main
    paths:
      - packages/**
      - Dockerfile
      - .dockerignore
jobs:
  build:
    runs-on: ubuntu-latest
    steps:
      - uses: actions/checkout@v2
      - name: Build the Docker image
        env:
          DOCKER_USERNAME: $\{\{ secrets.DOCKER_USERNAME \}\}
          DOCKER_PASSWORD: $\{\{ secrets.DOCKER_PASSWORD \}\}
        run: |
          IMAGE_TAGGED="xtechnology/$\{\{ github.event.repository.name \}\}:${GITHUB_SHA}"
          IMAGE_LATEST="xtechnology/\$\{\{ github.event.repository.name \}\}:latest"
          echo ${DOCKER_PASSWORD} | docker login -u ${DOCKER_USERNAME} --password-stdin
          docker build -t ${IMAGE_TAGGED} -t ${IMAGE_LATEST} .
          docker push ${IMAGE_TAGGED}
          docker push ${IMAGE_LATEST}
          docker logout
Pulumi
Intro
Pulumi - Developer-First Infrastructure as Code
- Flexible and expressive
Loops, conditionals, functions, classes, and more.
- Be productive
Gets things done in seconds rather than hours.
- Share and reuse
Define and consume patterns and practices to reduce boilerplate.

- Language: Python, TypeScript, JavaScript, Go, C#, F#
- Infrastructure Reuse and Modularity: Flexible. Reuse functions, classes, packages, and Pulumi components.
- Secrets are encrypted in transit and in the state file.
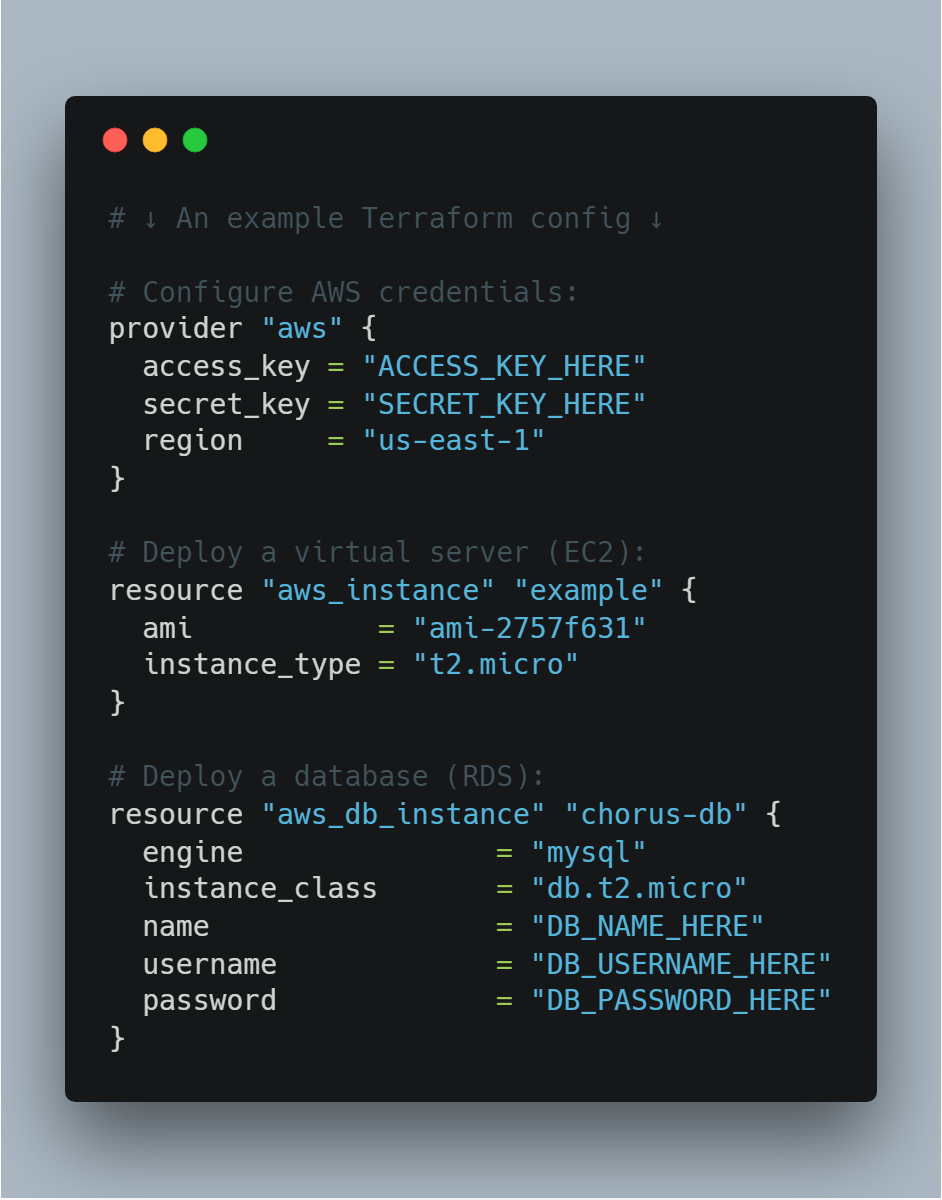
Compared to Terraform?
Terraform is an open-source infrastructure as code software tool that provides a consistent CLI workflow to manage hundreds of cloud services.
- Language (HCL)
- Infrastructure Reuse and Modularity: Constrained. Can only reuse Terraform modules.
- Secrets are stored in a separate product (Vault). There is no way to encrypt them in the state file.
Pulumi and Google Cloud Platform (GCP) setup
Let’s get started from pulumi installation and initial infrastructure repo setup.
-
Let’s first install
gcloudwith a command. Follow instructions here as installation depends on the machine and OS. - Next, we need to get
pulumicli installed.brew install pulumi - Now it’s time to create infrastructure project in
infrafolder with the following command.pulumi new typescript - Let’s get authorized registered at GCP and Pulumi
- https://console.cloud.google.com
- https://app.pulumi.com
- Get authorized in cli commands:
pulumi login gcloud login gcloud auth application-default login - Get dependencies installed in
infrafoldernpm install - Configure access to GCP from pulumi
pulumi config set gcp:project <your-gcp-project-id> # e.g. xtechnology
pulumi config set gcp:region <your-region> # e.g us-west1
- Yay! Now we’re ready to start coding our infrastructure straight away.
Kubernetes Cluster
Let’s get started with Kubernetes Cluster in GCP, and for this purpose we’re going to use Pulumi to start.
We need to import a file, containing description of our cluster.
import { kubeconfig, cluster } from "./cluster";

export const clusterName = cluster.name;
export const config = kubeconfig;
Now, let’s try to do a simple command to build our infrastructure in the cloud:
pulumi up
Let’s check our cluster at the Google Cloud Platform. Great! It’s there, just in few lines of TypeScript code.
Install ingress into kubernetes cluster
What is Ingress? Ingress exposes HTTP and HTTPS routes from outside the cluster to services within the cluster. Traffic routing is controlled by rules defined on the Ingress resource.

Let’s add it with the following code:
import { ingressServiceIP } from "./k8s/system";

export const externalIp = ingressServiceIP;
Right after applying this code, we can see externalIp it’s our public IP of the cluster.
Now let’s attach DNS to this IP.
DNS
We’re going to use CloudFlare for DNS as it provides very rich api and also an extra features like Anti-Ddos and more.
import { mainRecord } from "./dns";

export const domain = mainRecord;
Once again pulumi up to see the changes applied.
Deploy NestJs Application
import { currencyConverter } from "./k8s/apps";

export const service = currencyConverter.urn;
Let’s find clusterName in pulumi output and use it to get access to cluster with kubectl command.
gcloud container clusters get-credentials apps-cluster-4eef4bd --region=europe-west2-b
Let’s create a proxy forwarding to our service inside the kubernetes cluster
kubectl port-forward -n apps-q0fg8ahd svc/currency-converter-grpc 8080:80
Now it’s the moment to call our currency-converter:
curl -X GET http://localhost:8080/currency-converter/convert
But, we have DNS, right. Let’s try the same call via domain name:
curl -X GET https://in1.app/currency-converter/convert
Great 🎉!
We’ve just created the full infrastructure and deployed our NestJs application into the Kubernetes cluster using Helm chart, pulumi, and Typescript.
Helm
Helm is a package manager for Kubernetes. Helm is the K8s equivalent of yum or apt. Helm deploys charts, which you can think of as a packaged application.
We store our helm charts inside the ./infra/charts folder.
By running a command we can create a new helm chart:
helm create grpc
Helm also provides an ability to easily template our package, so we can provide multiple values into the chart, when we deploy it.
Following command will show us rendered a yaml definition of the helm chart
helm template grpc
Practice
It’s time to have some practice and evolve our services even more!
Let’s grab a task based on the things you’d like to do 👇
Summary
- GRPC
- Node.js
- NestJS
- Microservices
- Pulumi
- Compare to Terraform
Feedback
Please share your feedback on our workshop. Thank you and have a great coding!
If you like the workshop, you can become our patron, yay! 🙏
Links
- Protocol Buffers Crash Course
- gRPC Crash Course - Modes, Examples, Pros & Cons and more
- NestJS Microservices - 4 - Using gRPC
- NestJS
- Dependency Injection
- Monolith
- Prereqiuisites and principles
Technologies
microservices pulumi google cloud platform devops node.js nestjs javascript protobuf grpc typescript lerna npm yarn docker git architecture crypto currency